7 posts on Selectors

Accessible star rating widget with pure CSS

2 min read 0 comments Report broken page

For ages, we couldn’t utilize the sibling combinators (~ and +) to ease the pain of creating star rating widgets, because of this stupid Webkit bug. Nowadays, not only it’s fixed, but the fix has already propagated to Chrome and Safari 5.1. So, we can at least use the sibling combinator to make coloring the stars easier.

But can we use no JavaScript for a rating widget and make it just with CSS?

Actually, we can. By adapting Ryan Seddon’s technique for custom radio buttons with CSS, we can turn a series of radio buttons into stars that change colors (for the purposes of this demo they’re just unicode characters that change colors, but in your case they may as well be images) and use the sibling combinator to color the previous stars. A series of radio buttons is what many people use as a star rating widget fallback anyway, so the markup required is not necessarily more than usual. The only thing that needs to be done differently is their reverse ordering: The highest ratings need to go first, due to the way CSS3 selectors work (this limitation might be removed in CSS4, but that’s a long way ahead).

Of course, you’d still need JS to attach an event handler if you want the votes to be registered through AJAX, but that’s not part of the rating widget per se (it could still work as part of a regular form).

What’s best is that it’s fully keyboard accessible (focus and then use keyboard arrows) and screen reader accessible (although VoiceOver will also pronounce the generated stars, but that won’t happen if you use images instead of unicode stars). I’m guessing it could become even more accessible with proper ARIA, but I’ll leave that as an exercise to the commenter :D

In browsers that don’t support :checked (essentially only IE < 9), it degrades to a series of radio buttons (haven’t verified that it does, but it should do).

So, here it is:

Legal note, for those who need it: This code is MIT licensed.


Pure CSS Tic Tac Toe

1 min read 0 comments Report broken page

It’s supposed to be used by 2 people taking turns (click twice for the other sign).

Basic idea:

  • It uses hidden checkboxes for the states (indeterminate means empty, checked means X, not checked means O) and labels for the visible part
  • When it starts, a little script (the only js in the demo) sets the states of all checkboxes to indeterminate.
  • It uses the :checked and :indeterminate pseudo-classes and sibling combinators to change the states and show who won.
  • Once somebody clicks on a checkbox (or in this case, its label) they change it’s state from indeterminate to either checked or not checked, depending on how many times they click on it.

As a bonus, it’s perfectly accessible through the keyboard (although I assume it’s not screen reader accessible).

A <table> would be much more appropriate for the markup, but I decided to sacrifice semantics in this case to make the demo simpler.

All modern browsers support the indeterminate state in checkboxes (for Opera you will need the latest Opera.Next), however this demo doesn’t work on old Webkit (Chrome and Safari) because of an old bug that made the sibling combinators (+ and ~) static in some cases which has been fixed in the nightlies. It should work in Firefox, Opera.next, Webkit nightlies and IE9, although I haven’t tested in Opera.next and IE9 to verify.

Enjoy:


Rule filtering based on specific selector(s) support

2 min read 0 comments Report broken page

I’ve been using this trick for quite a while, but I never thought to blog about it. However, I recently realized that it might not be as common as I thought, so it might be a good idea to document it in a blog post.

If you follow the discussions on www-style, you might have noticed the proposal for a @supports rule to query property and value support. Some people suggested that it should also test for selectors, for example whether a certain pseudo-class is supported. However, you can do that today, albeit in a limited manner (no OR and NOT support).

The main principle that you need to keep in mind is that browsers are expected to drop rules with selectors they don’t understand, even partially. So, if only one selector in a group cannot be parsed, the whole rule will be dropped. This means we can construct selector “tests”, which are use cases of the selector whose support we want to test, that will not match anything, even if the selector is supported. Then, we include that selector in the beginning of our selector group. If all this is unclear, don’t worry, as there’s an example coming next :)

Example

Suppose you want to apply the following CSS (for rudimentary custom checkboxes):

input[type=“checkbox”] { position:absolute; clip: rect(0,0,0,0); clip: rect(0 0 0 0); }

input[type=“checkbox”] + label::before { content: url(‘checkbox.png’); }

input[type=“checkbox”]:checked + label::before { content: url(‘checkbox-checked.png’); }

only in browsers that support the attribute equality selector, the :checked pseudo-class and the ::before pseudo-element. We need to try to think of a selector that includes all of them but matches nothing. One such selector would be #foo[type="checkbox"]:checked::before. Even in supporting browsers, this matches nothing as there’s no element with id=“foo”. We can reduce the test for every rule to conserve bandwidth: For example, we don’t need to include tests for the attribute selector in any of them, since they are present anyway in all three rules. Also, we may eliminate ::before from the second test and we don’t need any test for the 3rd one, since it includes all features we want to test for. To sum up:

#foo:checked::before, input[type=“checkbox”] { position:absolute; clip: rect(0,0,0,0); clip: rect(0 0 0 0); }

#foo:checked, input[type=“checkbox”] + label::before { content: url(‘checkbox.png’); }

input[type=“checkbox”]:checked + label::before { content: url(‘checkbox-checked.png’); }

An important caveat of this technique is that Internet Explorer up to version 7 will split selectors before parsing them, so it will completely ignore our filters :( (Thanks to Ryan Seddon for finding that out).

Disclaimer: The original idea about custom checkboxes belongs to Ryan Seddon, although his code was quite different.


Styling elements based on sibling count

1 min read 0 comments Report broken page

The original idea belongs to André Luís, but I think it could be improved to be much less verbose.

André’s solution is like this:

/* one item */
li:nth-child(1):nth-last-child(1) {
	width: 100%;
}

/* two items */ li:nth-child(1):nth-last-child(2), li:nth-child(2):nth-last-child(1) { width: 50%; }

/* three items */ li:nth-child(1):nth-last-child(3), li:nth-child(2):nth-last-child(2), li:nth-child(3):nth-last-child(1) { width: 33.3333%; }

/* four items */ li:nth-child(1):nth-last-child(4), li:nth-child(2):nth-last-child(3), li:nth-child(3):nth-last-child(2), li:nth-child(4):nth-last-child(1) { width: 25%; }

It’s based on the relationship between :nth-child and :nth-last-child. As you can see, the number of total rules is O(N) and the number of selectors in every rule is also O(N).

However, what you really want, is to just target the first element. The others can be targeted with just a sibling selector. With my improvement, the number of total rules is still O(N), but the number of selectors in every rule becomes just 2, making this trick practical for far larger numbers of children:

/* one item */ li:first-child:nth-last-child(1) { width: 100%; }

/* two items */ li:first-child:nth-last-child(2), li:first-child:nth-last-child(2) ~ li { width: 50%; }

/* three items */ li:first-child:nth-last-child(3), li:first-child:nth-last-child(3) ~ li { width: 33.3333%; }

/* four items */ li:first-child:nth-last-child(4), li:first-child:nth-last-child(4) ~ li { width: 25%; }

And here’s a fiddle to prove it:

Yes, I know that with Flexbox and the other layout modules, techniques such as these are soon becoming obsolete, but I think they are still useful right now. I’m also aware that you can emulate this particular example with table display modes, but a) Table display modes have other implications that are sometimes undesirable and b) Widths are just an example, you could come up with other ways to style the elements based on their total count, which can’t be emulated by CSS tables.


CSS3 structural pseudo-class selector tester

1 min read 0 comments Report broken page

I was doing some research today about how people explain the CSS3 structural* pseudo classes and I stumbled upon this demo by CSS tricks: http://css-tricks.com/examples/nth-child-tester/

I thought the idea is awesome, but lacks a few features:

  • It doesn’t use the native browser algorithm for selecting the elements. Granted, it’s not that tough to code your own properly, but I trust a browser implementation more (IE doesn’t support these altogether, so it’s out of the question anyway).
  • Doesn’t allow you to test for nth-last-child, nth-of-type, nth-last-of-type (and especially the last two are a lot harder to understand for most people)
  • Doesn’t allow you to add/remove list items to see the effects of the selector with different numbers of elements (especially needed if nth-last-child, nth-of-type, nth-last-of-type were involved)

So, I decided to code my own. It allows you to test for all 4 nth-something selectors, supports adding/removing elements (the selected elements update instantly) and uses the native browser implementation to select them (so it won’t work on IE and old browsers).

Enjoy: CSS3 structural pseudo-class selector tester :)

*Yes, :root and :empty also belong to those, but are rarely used. All other structural pseudoclasses are actually shortcuts to some particular case of the aforementioned 4 :)

Original, Releases, Selectors, Educational, Nth Child, Nth Last Child, Nth Last Of Type, Nth Of Type
Edit post on GitHub

CSSNinja's custom forms revisited to work with CSS sprites

1 min read 0 comments Report broken page

I read today CSS Ninja’s (Ryan Sheddon’s) brilliant new technique about the creation of custom checkboxes and radio buttons with CSS alone.

The only thing that bugged me about it was something he pointed himself out as well:

This technique has only 1 drawback I can think of, IE support is not a drawback for me, you can’t use a big sprite image to save all the radio and checkbox states, they need to be individual images. Using CSS generated content to insert an image doesn’t give you control of the image position like a background image does.

And then I wondered “but hey, why can’t we use background images?”. It seemed pretty obvious to me that we could combine a transparent text color with normal css sprites and a display of inline-block in the ::before pseudo-element to achieve the exact same effect. I verified that my initial assertion was actually correct, and tested it in Firefox, Chrome, Safari and Opera (the latest only, no time for testing in older ones at the moment) and it seems to work fine.

Here it is: demo | source files (including .psd file of the sprite)

I’m afraid there’s some blatantly obvious drawback in my approach that made Ryan prefer his method over this, but I’m posting it just in case


Better usability in 5 minutes

3 min read 0 comments Report broken page

In this post I’m going to share some tips to increase a site’s usability that are very quick to implement. Not all of them are cross-browser, but they are the icing on the cake anyway, nobody would mind without them.

This is a personal favorite. When you use CSS to style a button, or when you use an image (either as a background image or in the tag) to depict a fancy button, it will remain the same when being pressed in some or all browsers (depending on the case). You can use this easy trick to let the user know that he actually clicked something that is, indeed, clickable:

.mybutton:active { position:relative; top: 1px; left: 1px; }

which actually moves the button 1 pixel to the right and 1 pixel to the bottom when it’s being clicked. Try it, it’s actually quite convincing.

Other, equally quick options are: making the border inset, giving to the text a text-indent of 1px, reversing a gradient background (if you already use the reversed version somewhere else in the site, it is quick since you don’t have to use an image editor just for that), or a combination of them.

2. Smooth transitions

This is a webkit-only tip, but as I said, it’s just the icing on the cake, so who cares? If a smooth transition is crucial to your design, by all means, write a script for that or use a library. If you were planning to go the CSS-only way anyway, this will significantly increase the user experience for webkit users.

Let’s suppose that the links in your page are normally blue, and red on hover. To make the transition from blue to red smooth for webkit users, only 2 lines are needed in the CSS:

a { color:blue; transition-property: color; transition-duration: 1s; }

a:hover { color:red; }

The first one (transition-property) tells the browser which CSS property to smoothly transition and the second one (transition-duration) how long you want the whole effect to last. It’s important to place those in the normal CSS rule and not the one with the :hover pseudoclass, because otherwise there will be no transition when the user mouses out of the element. Please note that you currently need to also include browser prefixes for these properties or just use -prefix-free.

3. Add dingbats to buttons that depict their functionality

We all know that most browsers don’t like dingbat-only fonts. However, there are some dingbats that are available in most web-safe unicode fonts. For instance, review the following examples:

Without dingbats:

Next Previous Done Favorite

With dingbats:

Next → ← Previous ✔ Done ♄ Favorite

There are named html entities for some of them, others have to be used by their hex unicode index like êŻÂ  (you have to test the last ones a lot, since not all are web-safe enough).

You can find many such dingbats with their unicode hex codes in http://www.copypastecharacter.com/ and http://www.alanwood.net/unicode/dingbats.html.

Of course, if you have the time, by all means, use normal icons. If you don’t however, I find symbols to be a handy alternative. Sometimes I also use them as icon placeholders in work in progress until I find the time to design real icons.

4. Zebra rows

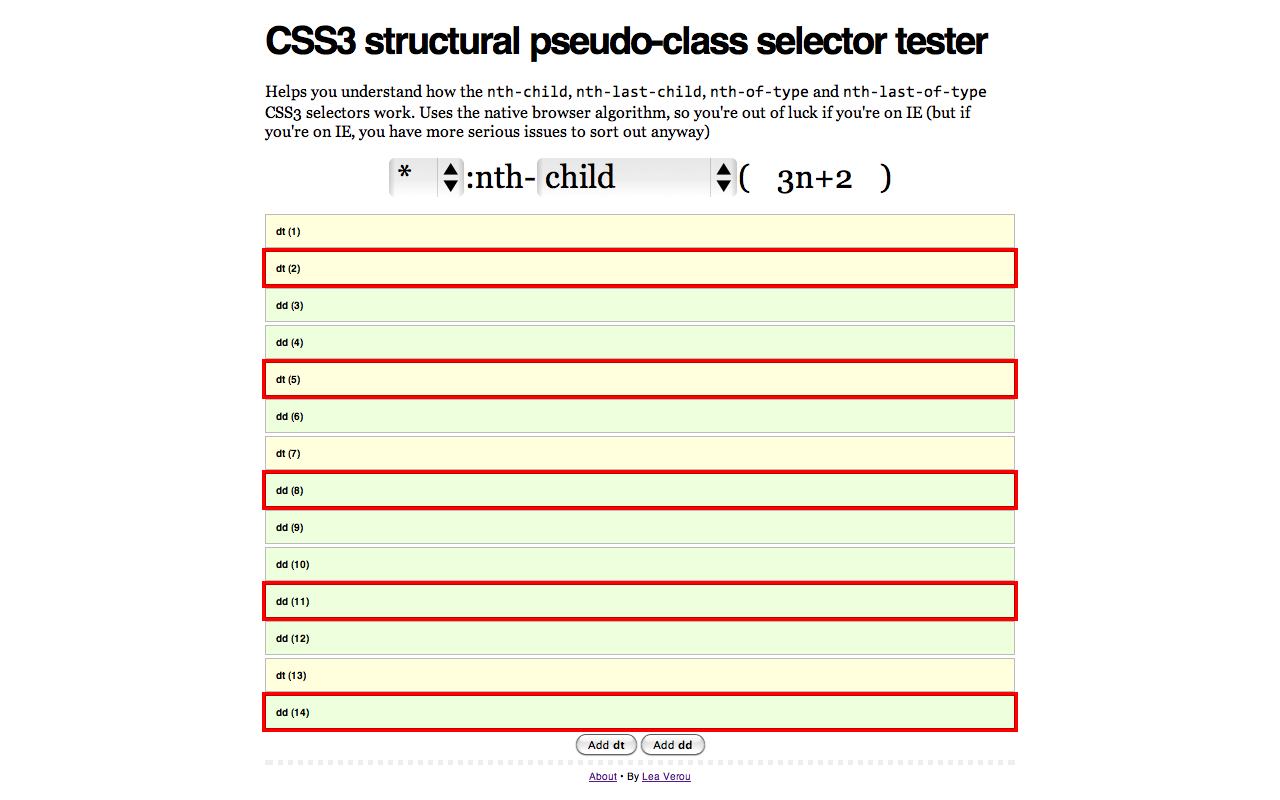
This won’t work on IE and Firefox 3. You can increase readability of tables and some types of lists by slightly alternating the background color of the rows. You’ve probably seen this effect numerous times and it’s usually done via JavaScript or the server side code that generates the table. You can quickly do it with plain CSS3 however, if you don’t mind it not working in IE and older browser versions or don’t have the time for a complete cross-browser solution:

table.stats tr { background:white; }

table.stats tr:nth-child(odd) { background:#f4f4f4; }

5. Highlight the current target

This won’t work in IE and older browser versions. If a particular page has lots of content, navigable by anchors (for example a FAQ page), you can use the CSS3 :target pseudo-class to let the user know where they landed:

h3:target { background:#FFFBCC; }

The h3 will only get a #FFFBCC background when it’s actually the landing point for the user. For example, if it has the id “foo”, it will get an #FFFBCC background when the user navigates to #foo.

That’s all folks

Did it actually take more than 5 minutes? ;)

Articles, Original, CSS, Selectors, CSS Transitions, Usability, WebKit, UX
Edit post on GitHub